Before reading this you should read through the Project and IDE Quick Start Guide. It's not a prerequisite, but you will get a faster start with Blockly if you are already familiar with the IDE Quick Start Guide.
¶ Blockly Blocks
Instead of writing text programming code, with Blockly you will drag-and-drop graphical code blocks into a work area. Blockly uses interlocking graphical blocks to represent code concepts like commands, variables, logical expressions, loops, and more. It allows users to apply programming principles without having to worry about syntax.
This block, for example, tells the robot's computer to set the left motor to a power level equal to joystick Channel A from the remote control:

There are a few things to know about blocks and how to use them.
¶ Basic Block
This is a basic block, which tells the robot's computer to do one thing, in this case to start the program and turn off the drivetrain:

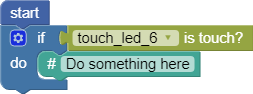
¶ Input
This is a block which uses an input. Inputs can be variables, numbers, sensor values, controller inputs or Boolean logical constants. The input fits into the puzzle-piece opening on the right-hand edge of the block. In our example, the If Do block is accepting an input from Touch LED sensor called "touch_led_6" and the value is either "True" or "False." We will go over If Do blocks below:
¶ Variable and Values
The Set block is used to set the value of a variable through the input notch. Variables can be text, numbers, or a Boolean. This example shows Variable1 being set to a fixed value of 350.25, which is about to be clicked into the variable, and Variable2 set to the value of Variable1.

¶ Working with Blocks
¶ Moving
- Move your cursor to a block
- When you are pointing at a block the cursor arrow will turn to a hand
- Click on the block, and holding your mouse button down, grab and drag the block to a new location
- If your block is on or very close to a compatible block, it will snap into place with an audible click, but if there is no click, they are not compatible

¶ Cut, Copy and Paste
- Cut a single block out of a diagram without changing anything else by clicking on the block and clicking on the "Cut" menu item
- You can also click on a block and select "Copy" which places a copy of the block on the clipboard so you can use a copy someplace else in your program
- You can then Paste anything you cut or copied
¶ Delete
- Select a block
- First method: click and drag the block to the trashcan icon in the bottom right corner of the programming area. This method will delete the block you selected plus all the other blocks connected below it in the diagram.
- Second method: click the block and press the "Delete" key on your keyboard. This will delete only the selected block, but not the ones underneath it.
¶ Undo/Redo
- On the toolbar, you will see Undo and Redo buttons. Use the "undo" to fix a mistake, and "redo" if you change your mind and want to reapply it. These are like Ctrl-X and Ctrl-Z in Windows
- If you use cut to remove a block, you will have to click "undo" twice to restore the block and dock it where it was previously
¶ Breakpoints
Click here to set a breakpoint. See "Debugging" below for information on using breakpoints.
¶ Zooming and Scrolling
- You can use your browser commands to resize your Blockly diagram or to drag the screen around
- You can center your diagram on the screen by clicking the "center" icon in the bottom right. This looks like a circle with a dot in the center.
- You can use the + and - icons in the bottom right to make the diagram image bigger and smaller
- You can use the slider bars to move your diagram up and down or left and right
¶ Make a Duplicate Block
- Right-click on a block
- Click on "duplicate" and an exact copy of the block will appear
¶ Inline or External Inputs
Simple blocks are easy to read, but more complex blocks like loops and logical conditionals (if-then-elseif-elseif-else for example) can be less clear. If you want an expanded format, right-click on a block, then click on External Inputs. To revert back to the denser format, select Inline Inputs. Try this on your projects, and remember that you can also revert an inline display to external and vice versa.
This example shows External Inputs selected in the If statement:
This example shows Inline Inputs selected:
¶ Add Comment to a Block
- Click on any block
- Right-click on the block
- You will now see a small question mark "?" on the block
- Click on the "?" to add comment text
- This text will appear if you click on the "?" or you can see it in the code on the "Generated Code" tab
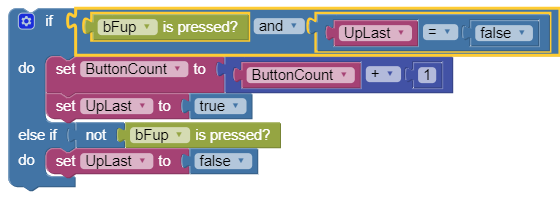
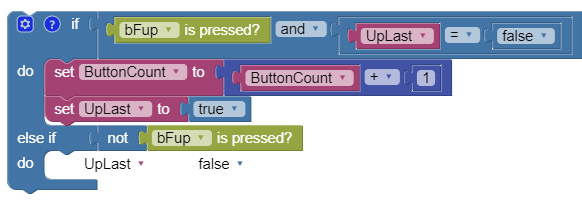
¶ Expand/Collapse and Disable/Enable a Block
Sometimes you want to make a block smaller on screen so that it is easier to see other blocks. This is most useful to "shrink" large blocks like If statements or Repeat loops. The disabled option makes a block turn white, and is not included in the downloaded code. Enable turns the block back on. Right-click on the block, then select Expand/Collapse or Disable/Enable from the context menu.
This example includes no collapsed blocks and one disabled block. The "Uplast ... false" block is disabled:
This is how they look with some collapsed:
Right-click on a block to see the menu that includes Expand or Collapse.
¶ Writing Your Blockly Code
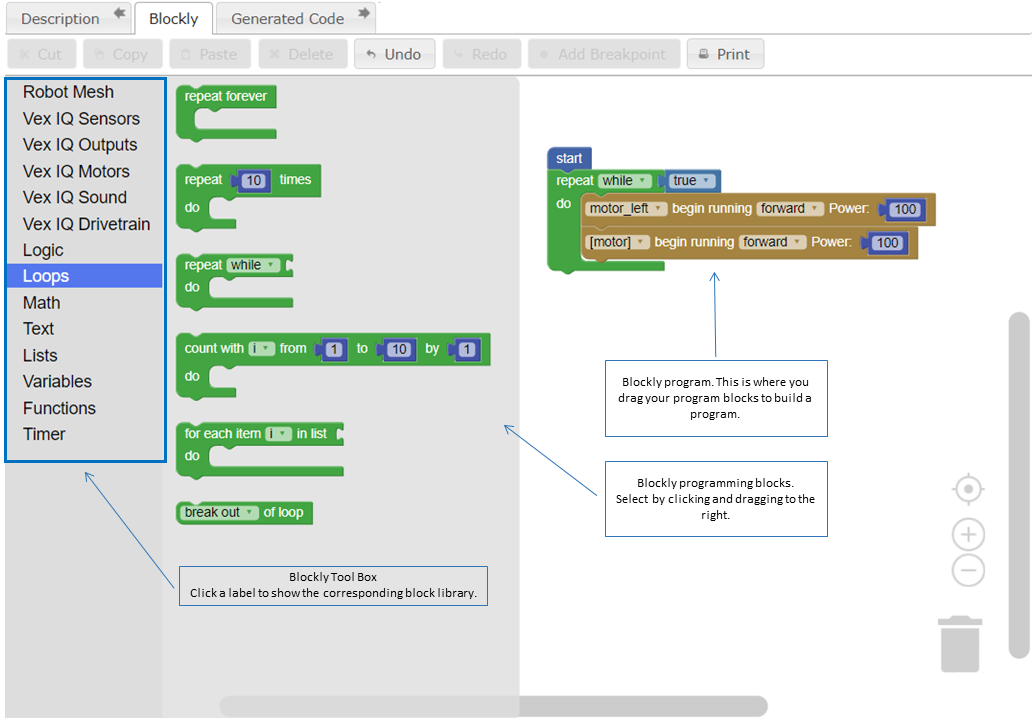
The Blockly programming area in the Robot Mesh Studio IDE looks like this:
When you write in Blockly, the system is automatically generating Python code, which is what is downloaded to your robot. Whenever you click on a block, not only is it highlighted in the Blockly window, the corresponding line of Python code in the Generated Code tab is also highlighted. This makes it very easy to see the relationship between the Blockly blocks and Python code. Likewise, clicking on a line of Python code in the Generated Code tab will highlight the corresponding block in the Blockly tab.
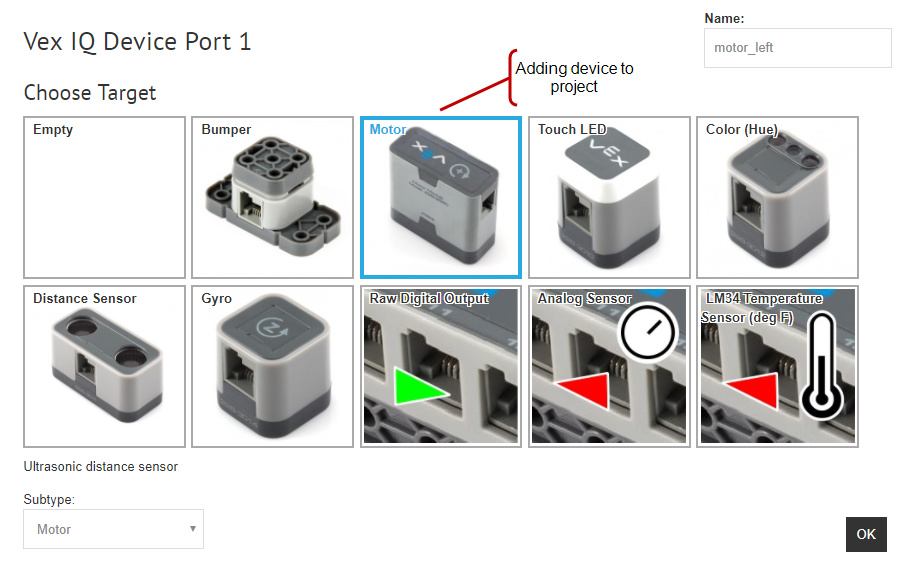
In addition to the code in the Blockly blocks, programmers need to add the real-world or mimic motors and sensors installed on the robot. These are configured in the Device Monitor.
¶ Device Monitor and Configuration Area
Robot programming is unique, in that your code has to interact with either physical devices (a "real" robot) or a virtual robot (a mimic). Part of what you will do is configure the devices that are included in your robot, and then use Blockly to add them to your programming. For VEX IQ, you can use the "Detect Sensors" button to poll a physical robot and fill most of this out automatically.
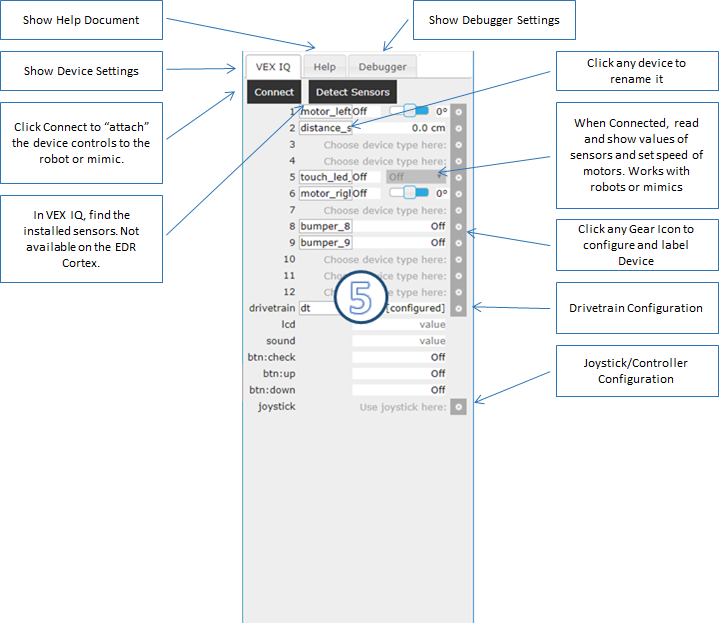
When you click the little gear in the Devices panel, you will configure it using this screen:
¶ Using Debug to Test Your Code
Robot Mesh Studio offers controls to allow you to test your code step-by-step. To do this we set breakpoints in the code, and then use special controls to essentially run the code slowly so that you can see the execution.
¶ Setting a Breakpoint
Breakpoints are simple in Blockly, right-click on a block and then click on "Set Breakpoint." The block that you are pointing at will change color to bright red and is now a breakpoint. This sample shows one motor block that is a breakpoint and a second that is not:
You will use special menu controls that will appear when you have a breakpoint set. These are the debugging controls.

You won't see the debugger controls until you click "Run." When the program is running in the debug mode, these are the options you can use.
- Continue runs the next line of code, and continues execution until a breakpoint or the code is complete.
- Step Over executes whatever happens on the next line and jumps to the next line.
- Step In will jump to and pause a function at its first line, if the line of code is a function (subroutine) call.
- Step Out executes the remainder of the current function and then pauses at the next statement after the function call.
¶ The Blockly Toolbox
The Blockly toolbox contains the code blocks you will be using, divided into functional subsets. The first six are for use in programming VEX robots and mimics, and the others are standard Blockly blocks. We will go over these in more detail below.
¶ Robot Mesh Section
You select a part of the toolbox by putting your mouse cursor over the name of the section. In this case, we are showing the "Robot Mesh" tools highlighted.
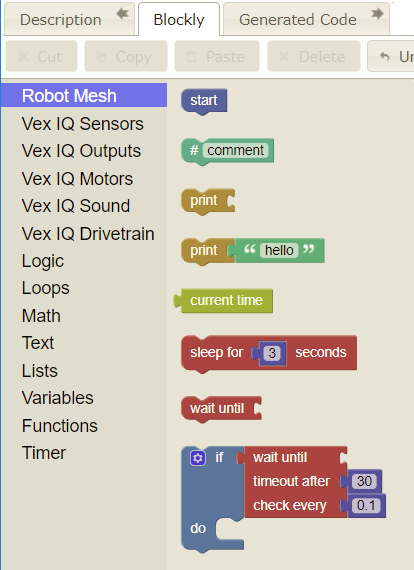
Start is required at the top of all threads. There must be at least one per program.
# Comment offers the programmer a place to place notes in their code. These are ignored by the robot.
Print writes the input to the Program Status window in the development environment. This is used most often in testing and debugging.
Print "Hello" outputs a text string (in this case, "hello") to the Program Status window.
Current Time is an input block showing the elapsed time, in seconds, since the program started running.
Sleep for # Seconds will cause the processor to sit an wait for "#" seconds before continuing to run. Nothing happens while the robot is sleeping.
Wait Until the condition in the input is "true."
If Do, Wait Until is similar to Wait Until, with the difference that it will only wait for the timeout after input value (in seconds) and check every period in the input (in seconds). This is an advanced feature and is rarely used.
¶ VEX IQ Sensors
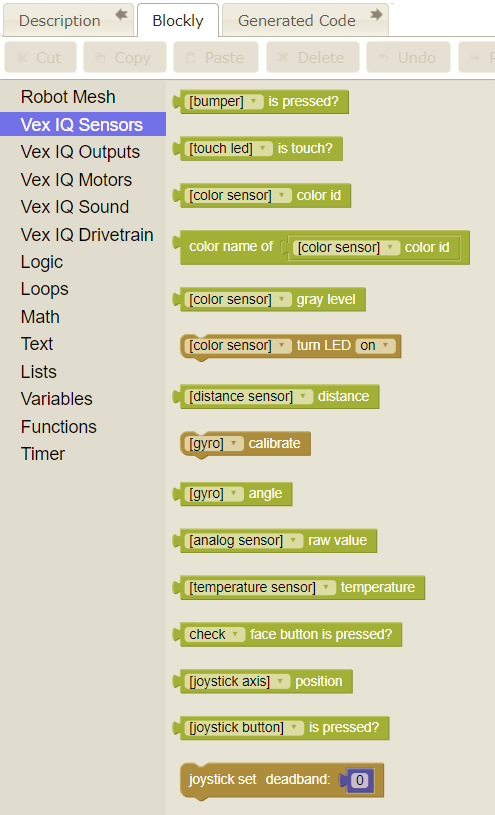
Bumper returns True if pressed, False if not pressed.
Touch LED is touch if the Touch LED is pressed with a finger returns True if pressed, False if not pressed.
Color Sensor returns the color value "seen" by the sensor. The Color Sensor has two modes: color and grayscale. When you add the Color Sensor to your project, make sure you open it in the Device Configuration screen, click on the gear to configure it, and select either grayscale or color in the drop down box. If you try to read color values in grayscale mode, or vice versa, you will get "garbage" readings in your program.
Color Name of Sensor returns the name of the color.
These are the color names (hues) and corresponding color values that the sensor will return:
OFF = 0
RED = 1
RED ORANGE = 2
ORANGE = 3
YELLOW ORANGE = 4
YELLOW = 5
YELLOW GREEN = 6
GREEN = 7
BLUE GREEN = 8
BLUE = 9
BLUE VIOLET = 10
VIOLET = 11
RED VIOLET = 12
WHITE = 13
Color Sensor gray level instead of color hue, this returns the grayscale value detected by the color sensor. It is represented as a percentage from 0 to 100.
Color Sensor turn LED the Color Sensor has an LED light which can be turned "On" or "Off" to make the sensor work better.
Distance Sensor uses ultrasonics to determine distance between the sensor and an obstacle. This can be from 0 to 250cm. You can use the Device Configuration screen to select centimeters, inches, or millimeters.
Gyro Calibrate before using the Gyro, use this to calibrate the sensor. Typical usage would pair this block with a "sleep" block set for 5-8 seconds right after it.
Gyro Angle the current gyro angle, from -180 to +180 degrees.
Analog Sensor raw value is an advanced feature. If you have integrated a non-VEX analog sensor into your VEX IQ Brain, you can read its value here.
Temperature Sensor is an advanced feature. If you have integrated a non-VEX temperature sensor into your VEX IQ Brain, you can read its value here in degrees F.
Check <> button returns the value of the VEX IQ Brain check, up and down buttons. Returns True if the specified button is pressed, and False otherwise.
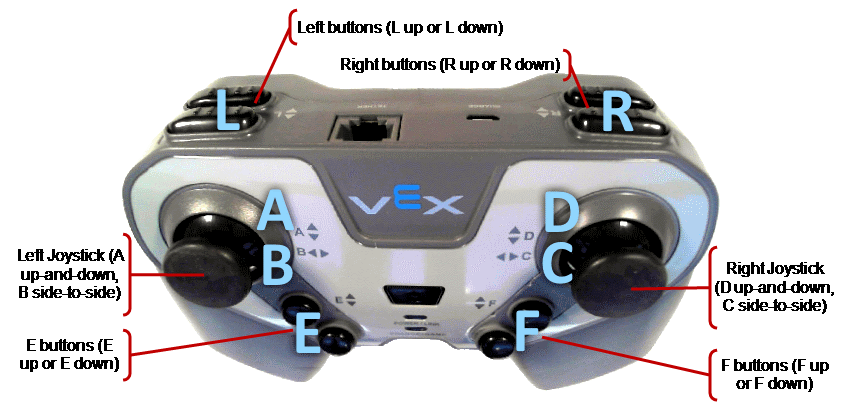
Joystick Axis returns value of the specified joystick axis. The value is from -100 to 100, and the possible axes are A,B,D and C as shown in the picture above.
Joystick Button returns these values for each of the eight buttons on the controller:
bEup: ButtonE-up pressed (True/False)
bEdown: ButtonE-down pressed (True/False)
bFup: ButtonF-up pressed (True/False)
bFdown: ButtonF-down pressed (True/False)
bLup: ButtonL-up pressed (True/False)
bLdown: ButtonL-down pressed (True/False)
bRup: ButtonR-up pressed (True/False)
bRdown: ButtonR-down pressed (True/False)
Joystick Deadband sets a deadband range. It's common for a controller (joystick) to have a small non-zero value even when the operator releases them. You can use the Joystick Deadband to keep motors from trying to activate and creep using these small values by setting a deadband range. If you set this to 5, for example, a common value, any Joystick axis value between -5 and +5 will be treated as zero. Only if the value is less than -6 or greater than 6 will the controller and robot respond. This is highly recommended.
¶ VEX IQ Outputs
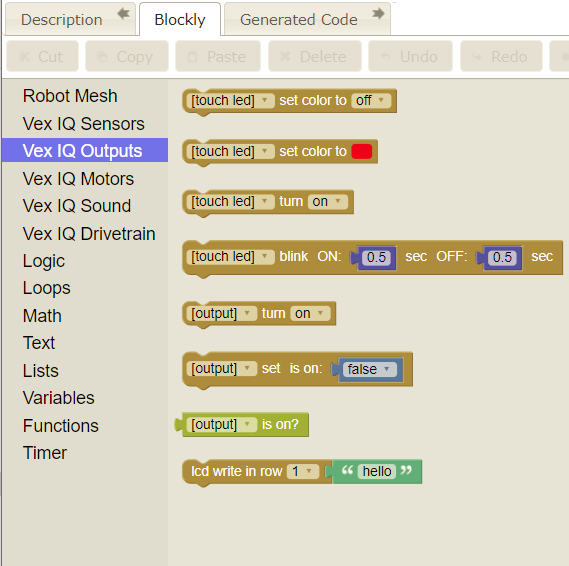
The Touch LED has two functions; it registers a fingertip touch, and it can display colors on the top of the sensor. Above we saw Touch LED "is touch" and here we use the functions to show colors.
Touch LED set color: both this and the following function set the color. This uses the words for colors, as seen above in the Color Sensor description (e.g., red, red-orange, orange...) If the Touch LED was not on when called, this will turn it on.
Touch LED set color sets to the color of the Touch LED using the color matrix in the Blockly block. If the Touch LED was not on when called, this will turn it on.
Touch LED turn is used to turn the color display of the Touch LED on and off, without changing the color displayed.
Touch LED blink sets the Touch LED to blink, with the on and off times in the value blocks.
Output turn turns the Raw Digital Output on or off. This is an advanced feature to support custom sensors.
Output set is on sets the value of Raw Digital Output "on" to true or false. This is an advanced feature to support custom sensors.
Output input is a value returning the status of the Raw Digital Output, on or off. This is an advanced feature to support custom sensors.
LCD write writes text to the LCD screen on the VEX IQ Brain. There are five possible lines, numbered 1 through 5.
¶ VEX IQ Motors
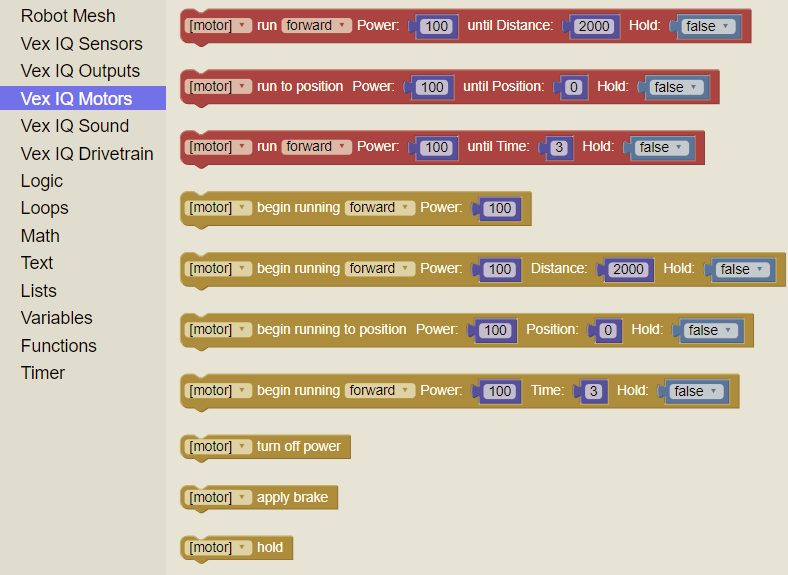
¶ Red Motor Blocks
Once started, the red motor blocks will run until the conditions in the block are met. You cannot terminate execution of a red motor block. All power values can be positive or negative. This can be confusing at first, but it all makes sense. If you set a motor to run forward at a negative power (like -50), the motor will run backwards. This is the same as setting the motor for reverse at a power of 50. We recommend that you always use positive values, and then set forward or reverse. This is true of all motor blocks that include forward/reverse as an option.
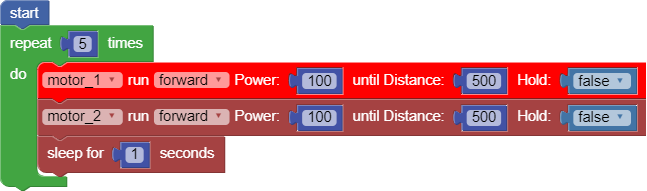
Run Power Distance tells the motor to run either forward or reverse, at a certain power (0 to 100) until the robot has covered a specified distance, in mm. Hold will tell the motor to keep at its current position if true, and not if it is false. This would be used whenever a robot has to run a certain distance.
Run Power Position tells the named motor to turn at a certain power (0 to 100) until the shaft has rotated a certain number of degrees as entered into "until Position." If the position value is positive, the shaft will rotate counter-clockwise as viewed from the shaft side of the motor, and clockwise if the value is negative. Hold will tell the motor to run to the position defined, then keep at its current angle if true, and not if it is false. This function is useful for autonomous programming or programming the buttons on the controller.
Run Power Time tells the named motor to turn at a certain power (-100 to 100) until a certain number of seconds have elapsed. Otherwise the same as Run Power Distance.
¶ Gold Motor Blocks
Unlike the red motor blocks, the motor commands in a gold block with keep running while the next block(s) in your program execute. Your program can also be doing other things while the motor is running. To interrupt a gold motor block, use another motor block such as Turn Off Power.
Begin Running Power
Turn on the referenced motor at the specified power level. There is no end state, and the motor will keep running until your program explicitly stops it.
Begin Running Power Distance Hold is like the red block Run Power Distance, except can be interrupted.
Begin Running Power Position Hold is like the red block Run Power Position, except can be interrupted.
Begin Running Power Time Hold is like the red block Run Power Time, except can be interrupted.
Turn Off Power turns off the specified motor by setting its power level to zero.
Apply Brake turns off the specified motor by setting its power level to zero, and tell the motor to hold its current position.
Hold tells the specified motor to actively hold its current position. This is useful to hold arms in place, or stop a robot from rolling back on a ramp.
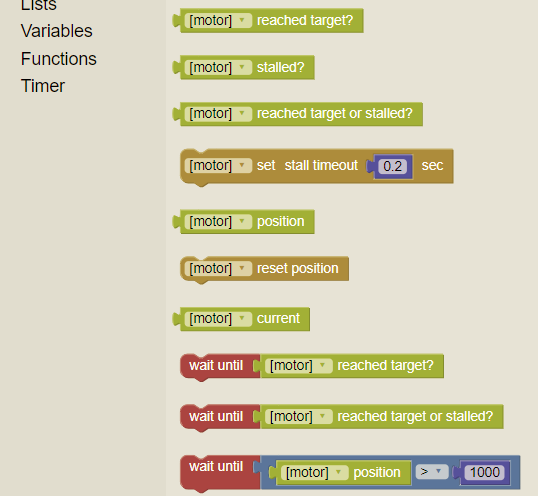
¶ Green Motor Inputs and Four Related Blocks
Reached Target? for the specified motor, true if the motor reached its target, and false if not.
Stalled? for the specified motor, true if the motor has stopped turning for a defined period of time with power applied, and false if not. In other words, if the stall time was set to 3 seconds, if the Brain is telling to motor to turn, but it stops turning for 3 or more seconds, the program "knows" that the motor is stalled.
Reached Target or Stalled? for the specified motor, true if the motor reached its target or stalled, and false if not.
Set Stall Timeout sets the stall timeout period, in seconds. The stall timeout time is used in other blocks to detect a motor stalled condition.
Position returns the current motor shaft position, in degrees.
Reset Position resets the motor's position value to 0. This can be useful for initializing a motor at the beginning of a program or function.
Current returns the electrical current use of the specified motor.
Wait Untils
The following three items are a combination of blocks and inputs.
Reached Target? the system will stop execution until the specified motor has reached its target. Wait Until cannot be interrupted.
Reached Target or Stalled? is the same as Reached Target except will wait until either the motor stalls or reaches its target. This can be useful in autonomous programming to detect if the robot or mechanism has stalled, such as hitting a wall or other obstacle.
Position is used here as part of a Wait Until block, where the program will wait for the motor specified to reach at least a certain position, in degrees.
¶ VEX IQ Sound
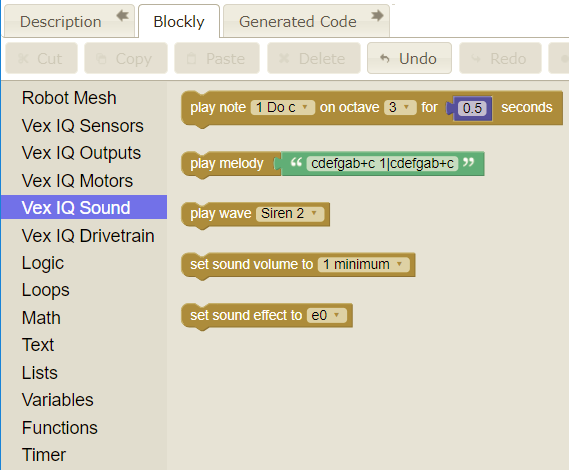
Play Note on Octave plays a single note for the specified duration.
Play Melody allows you to play a musical phrase in a single block.
Play Wave plays the chosen wav file stored on the VEX IQ Brain.
Set Sound Volume specifies the volume level as chosen.
Set Sound Effect is used in conjunction with Play Note on Octave to change the tone.
¶ VEX IQ Drivetrain
The Drivetrain functions behave like the Motor functions, except that you can control all motors assigned to the drivetrain can be controlled at once by using single blocks. Before using a Drivetrain block, you have to configure the drivetrain in the Robot Mesh Studio IDE:
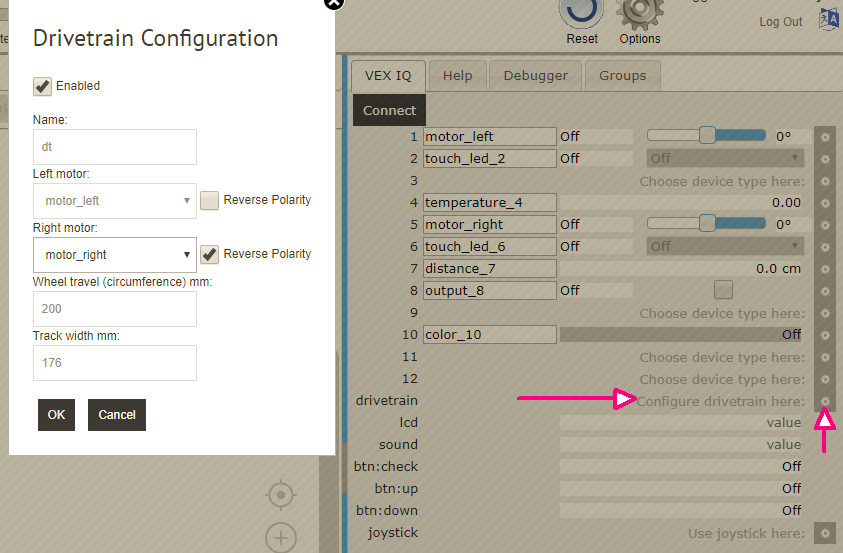
- Click the VEX IQ tab in the Devices Panel.
- Click on the gear to the right of "Configure drivetrain here:"
- Click on "Enabled"
- Add your drive motors to Left and Right. One of them will have to be reversed for this function to work properly.
- Add the wheel circumference (VEX IQ has multiple wheel sizes)
- Add the track width, which is the distance between wheels on opposite sides of the robot.
Now you are set to work with drivetrains.
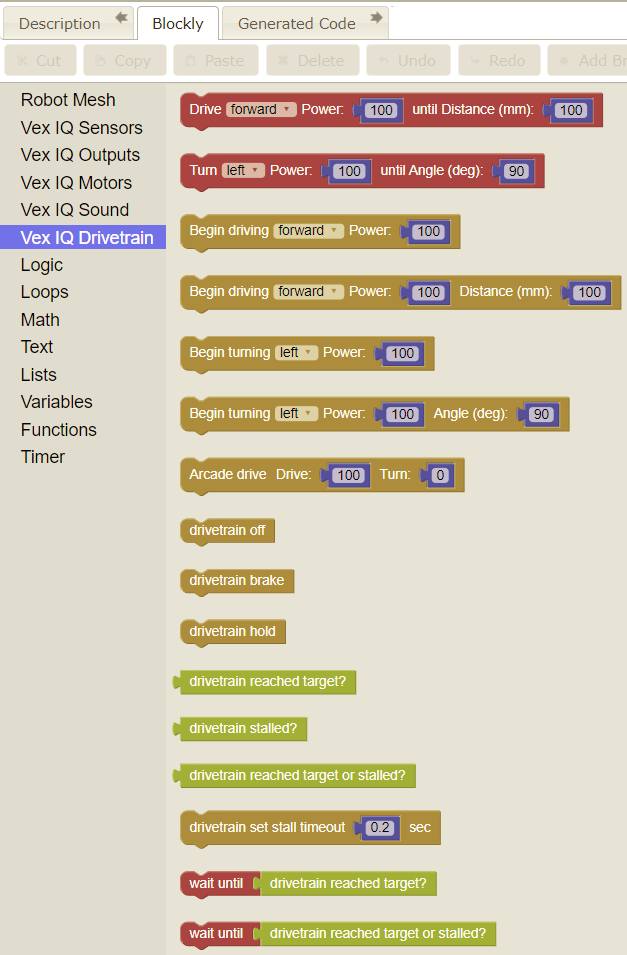
Red Blocks
As with Motor blocks, once started, the red motor drivetrain blocks will run until the conditions in the block are met. You cannot terminate execution of a red drivetrain block, and it will run until its condition is met (either distance or angle).
Drive Power until Distance will run the motors in either forward or reverse, at a power of 0 to 100, until the robot has traveled the specified distance, in millimeters.
Turn Power until Angle pivots the robot either left or right at a power of 0 to 100, until the specified angle is reached. The robot does not move, just pivots.
Gold Blocks
As with Motor blocks, the Drivetrain commands in a gold block with keep running while the next block(s) in your program execute. Your program can also be doing other things while the drivetrain is running. To interrupt a gold motor block, use another drivetrain block such as Drivetrain Off.
Begin driving Power runs either forward or backward at a specified power.
Begin driving Power Distance runs either forward or backward at a specified power until a specified distance is reached, in millimeters.
Begin turning Power starts the robot turning either left or right at a power of -100 to 100.
Begin turning Power Angle pivots the robot either left or right at a power of -100 to 100, until the specified angle is reached.
Arcade Drive applies power to the robot in two axes. The Drive value is the power applied in the forward (or reverse if it is a negative value) and the Turn power is that amount of force to change the robot's direction (to the left if negative, right if positive). This allows you to program in gradual turns to your robot, rather than the pivoting from the "Begin Turning" blocks above.
drivetrain off turns off the drivetrain.
drivetrain brake stops the drivetrain and holds.
drivetrain hold holds the current value of the drivetrain.
drivetrain set stall timeout sets the timeout value of the stall function, in seconds.
Inputs
These "plug into" blocks and control their behavior.
drivetrain reached target? is true if the target distance in a block is met.
drivetrain stalled? is true if the drivetrain stalls out longer than the stall timeout period set in a drivetrain set stall timeout block.
drivetrain reached target or stalled? is true if the target distance is met or the drivetrain is stalled out.
wait until drivetrain reached target? This is a combination of a red Wait Until block with the input value. It will keep executing until the drivetrain meets its target.
wait until drivetrain reached target or stalled? This is a combination of a red Wait Until block with the input value. It will keep executing until the drivetrain meets its target or stalls.
¶ Logic
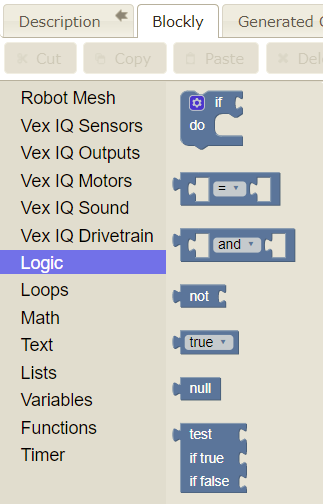
Boolean algebra is a mathematical system that has two values: true and false. Boolean values are used as inputs to the blocks, especially the If Do and the Logic blocks below. In the logic library, only one item is a block, the others are all inputs.
If Do is a block you will use in most of your programs. It compares values in the If statement, and then proceeds to actions based on the results of that comparison.
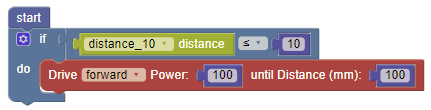
The simplest version of an If Do is where an expression is evaluated and if the result is true, do this block. In this example, if the current value of sensor distance_10 is less than or equal to 10, then drive forward 100mm:
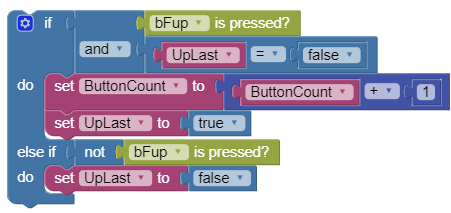
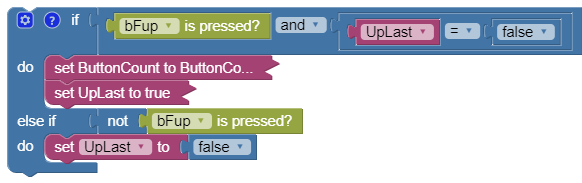
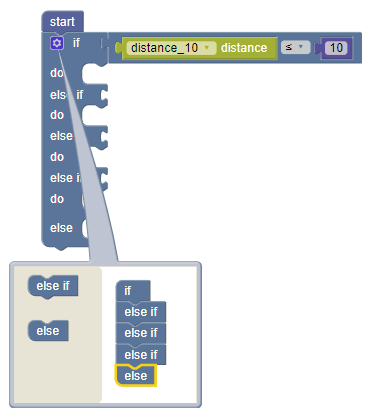
You can also build an If Do with multiple ifs and one else. The logic is that the computer will evaluate the If Do one step at a time, and when it finds the first "true" state it will execute that code then leave the If Do. This is how to set up a complex If Do, clicking on the gear icon on the If Do. You will click the gear again when you are done configuring the statement:
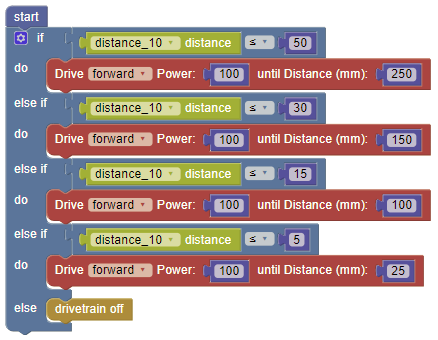
And here is a complex If Do filled in:
Math Comparison
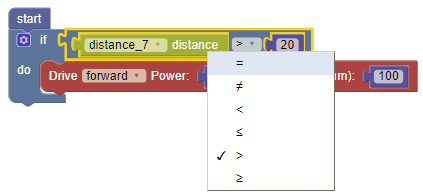
In this example, we use the comparison to say, "If the current value of the sensor distance_7 is greater than 20, do the drivetrain drive command. Not the comparison symbols available in the dropdown:
What if distance_7 is less than or equal to 20? You can click on the gear icon on the If Do to add an "else." See this example, where the robot will drive forward if the distance_7 value is greater than 20, or else turn to the right if it is not. This shows how to add the "else" option to the If Do block:
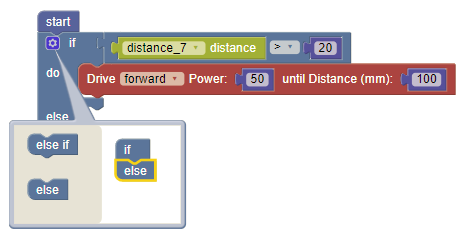
And this will be the final form with the "else" filled in:

The robot will only go straight if the if the value of distance_7 is greater than 20, otherwise it will turn to the right for 90 degrees.
Logical Comparison is used to compare two Boolean values. It uses either "and" or "or" to evaluate the expression. Here is an example:
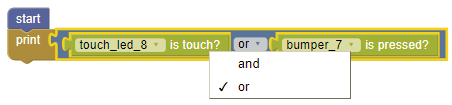
With the "and" operator, if both expressions are true, the whole input is true, and the Print block will print True on the console. With the "or" operator, the whole input is true if either of the two expressions are true, and false if neither is true.
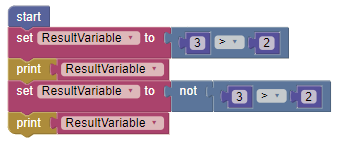
Not converts its Boolean input into its opposite. For example, in the first comparison, 3 is greater than 2 and the result is "true." If you add a Not, this turns the "true" to "false." Using Not is an advanced feature and you will not need it often.
True/False is the input you use to hold the Boolean values of True or False, chosen by clicking the dropdown on the input symbol.
Null is a special input that contains the value "none." Can be a function result for a function that has no defined return value. Advanced feature.
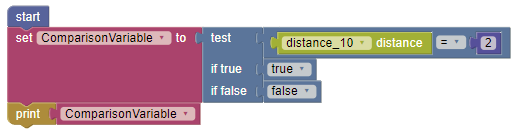
Test If True/False is an input that acts like an If Do block. This is an advanced feature, and most of the time you would simply use an If Do instead. In the example below, we compare the current value of the distance sensor to "2" and return true if is equal and false if it is not equal. We created a variable called "ComparisonVariable" to hold this value, and the Print block to display it.
¶ Loops
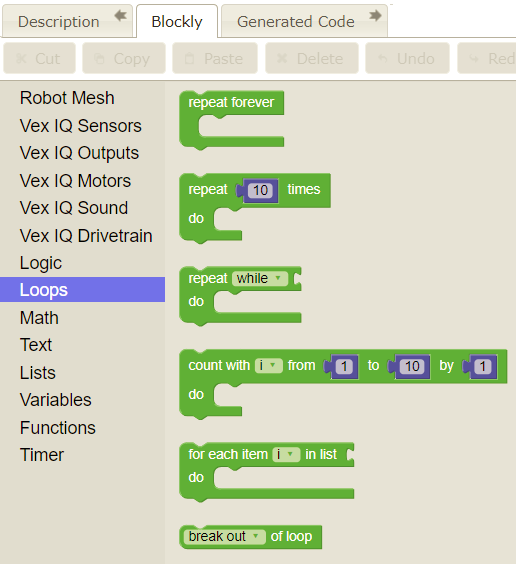
Repeat Forever allows your robot's computer to run the same code over and over. The main driver control code for a competition robot is usually placed in a repeat forever block.
Repeat <n> Times is similar to Repeat Forever, except that it will repeat the code a fixed number of times, then stop, while Repeat Forever will keep running until you either turn off the robot, or it executes a Break Out of Loop block (see below).
Repeat While/Until is used to repeat programming blocks while a condition is true, OR until some condition is met. This might be used for "drive until my robot runs into a wall" or "drive while the user presses a button on the joystick."
Count with is another type of loop which uses a variable, "i" in the example above, and increments it each time the loop executes. The value of the variable can be used inside the loop, and the last value (in this case 10) is skipped because the loop exits on the last value, which is 10. Here is an example:
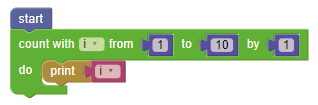
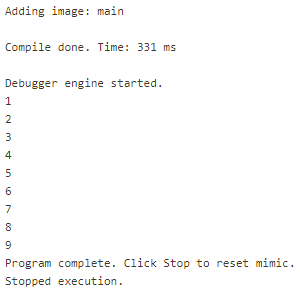
The program generates this output in the output message panel:
For Each Item in List runs a loop which goes through the loop "i" times for the "i-th" item in the referenced list. We will go over the use of the List blocks below.
Break Out of Loop instantly drops execution of the current loop, and executes the next line of code below the loop.
¶ Math
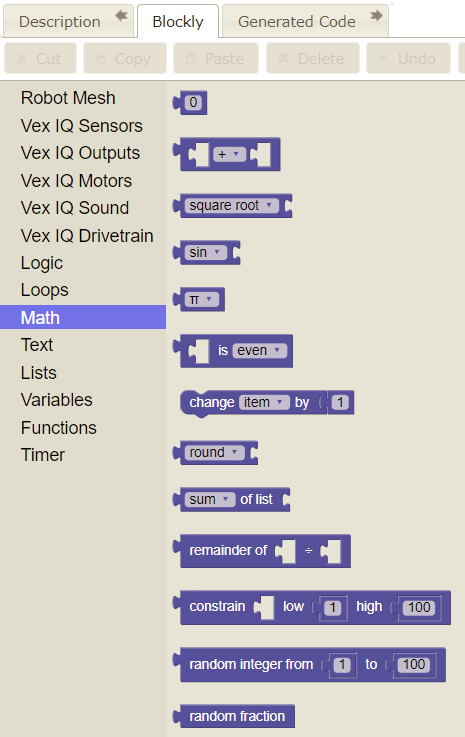
Only one of the Math library objects is a block, the others are all inputs.
Number is tan input that holds a numerical value. We've used some above, too.
Math Operator performs an operation on two values. Supported operators are + - x ÷ and ^. The up-carat is used for exponentiation.
Math Function performs advanced math functions on the value plugged into the right-hand input. Supported operations are square root, absolute, -, In, log10, e^, and 10^.
Trigonometry performs trigonometric functions on the value plugged into the right-hand input. Supported operations are sin, cos, tan, asin, acos, and atan.
Constants are common math constants, and include pi, e, φ, sqrt(2), sqrt(1/2), and ∞.
Value Property returns a Boolean for a Boolean entered on the left, and compared to the value on the right in the dropdown list, including even, odd, prime, whole, positive, negative, and divisible by.
Change by increments the value of a variable ("item" in the graphic above) by the amount attached to the input on the right. The result of this is a variable with a new value.
Round takes a numerical value plugged into the right-hand input. Options include round, round up, and round down.
Number List Statistical Properties takes the values of a list plugged into the right-hand input and performs a statistical operator on them. These include sum, min, max, average, median, modes, standard deviation, and random item.
Remainder returns the remainder after dividing the first number by the second.
Constrain constrains a number to be between the low and high values shown.
Random Integer generates an integer random number between the two values shown.
Random Fraction generates a random fraction between 0 and 1.
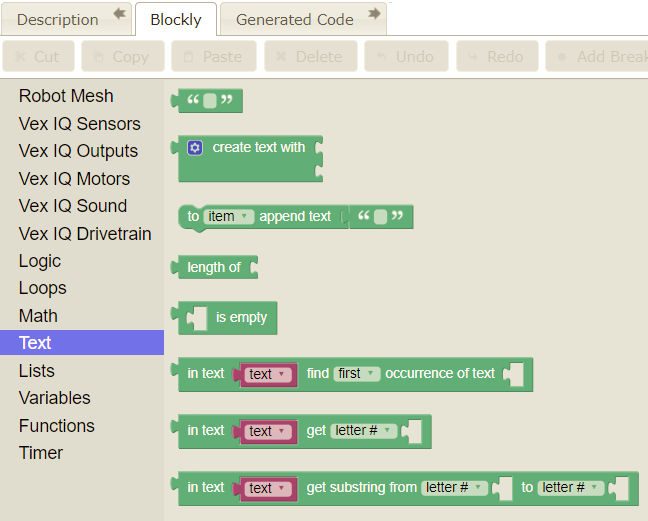
¶ Text
All of the items in the Text library are inputs except for Append Text. Text string manipulation is a key part of Python, and is very helpful in desktop programming. For robots, there are not a lot of applications, so we will go over these briefly. Please refer to standard Python programming resources online for more details on working with text strings.
Quote allows you to type in text, which can then be entered into other text items, printed to output, or printed to the LCD string.
Create Text
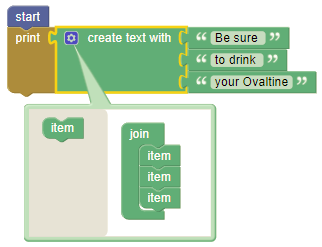
The setup screen appears when you click the gear, and closes when you click it again. You can add any number of items, which provide one socket each for text input. The Create Text function will then add the text strings together, from top to bottom, creating a single string of all the text. In the above example, the output will be, "Be sure to drink your Ovaltine."
Append Text adds the specified text string to the end of the string contained in the variable, in this case "item." If item was blank before this block, and we include the text "one" the variable item will now include the text string "one." If we run this again and add "two" the variable item will now be "onetwo".
Length Of returns an integer length of the screen. Remember, spaces are counted as characters so "VEX IQ" would return a Length Of 6.
Is Empty when any string is inserted into the function, Is Empty will return the Boolean True for an empty string, and False for any other number of characters.
In Text Find
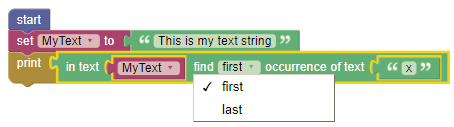
This function takes a text string, in this case the variable "MyText," and searches it for the text found in the string after "occurence of text," in this case the letter "x." It returns the location of either the first or last occurrence of the text in the string. In our example, the returned input value is 14.
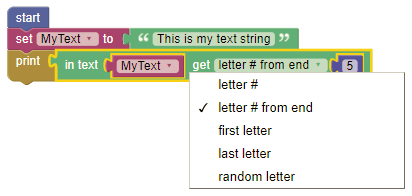
In Text Get return the Nth character from the text string. The dropdown list offers number of letters from front from end, or the first or last letter, or a random letter from the text. In our example, the function will return the fifth letter from the end, or the letter "t."
In Text Get Substring is used to copy a multiple-character string from a text string. It is similar to the other text functions.
¶ Lists
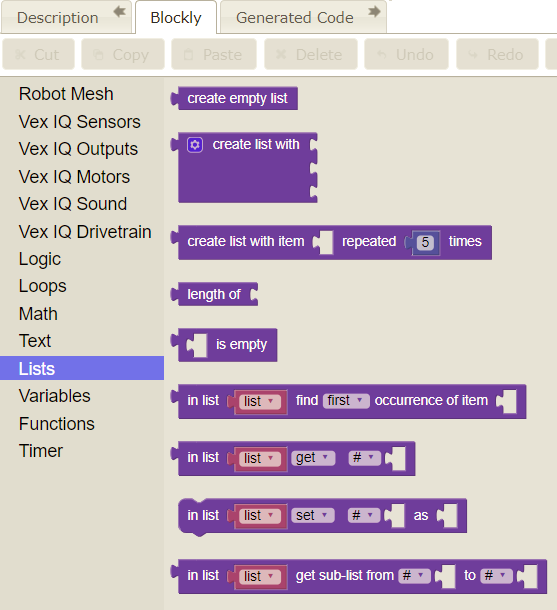
In Blockly, a list is a set of content with a single name. For example, you could create a list called DogSpecies, and fill it with lots of different values (poodle, Labrador retriever, cocker spaniel, etc.) In some other programming languages this might be called an "array."
5
True
[]
Create Empty List creates a new list with the given variable name.
![]()
Create List With a fixed list of items. The print command below produces: [7878, 7878, 7878, 7878, 7878]
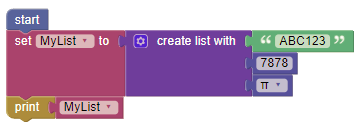
Create List With Item Repeated Similar to the previous function, but each item is the same, repeated a certain number of times. The print command below produces: [7878, 7878, 7878, 7878, 7878]

Length Of counts the number of items in a list. It returns an integer value.
Is Empty returns True for an empty list, and False for any non-empty list.
![]()
In List Find Occurrence returns the item location of a string found within the list. It returns either the first or last occurrence and the return value is a in integer of 0 or larger.
In List Get returns the Nth item in the specified list.
In List Set change one item in a list to a new value, or insert a new value into a fixed position in the list.
In List Get Sub-List takes an existing list, and extracts values in a defined range. This can be used to create a new named list.
¶ Variables
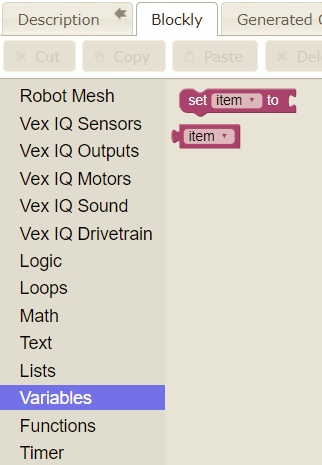
Only two items here. Set Item (a variable name) to an input value. You can use the dropdown to create a new variable or rename an existing one. The Item block is what stores the value of the variable "Item." Variables can store single values or a list of values.
¶ Functions
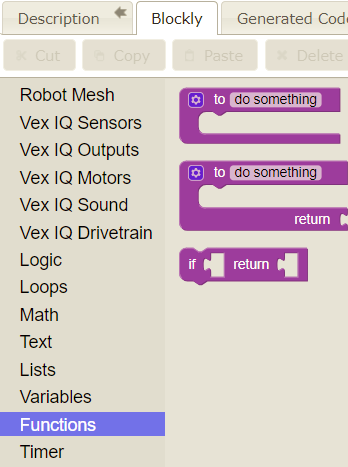
Functions are blocks of code that can be named and may or may not return a function value when finished. These are also called subroutines. You use the first two symbols to create a function in your program, and then use function name input value to invoke it.
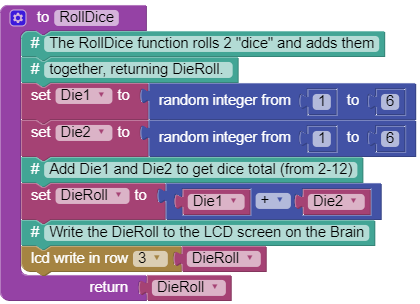
Here is an example of a Blockly VEX IQ program that uses a function call to roll dice, and then makes the robot turn right or left depending on the dice results. The dice-rolling function is called "Roll Dice" and is defined below under the main program.
Functions in Blockly make code more readable, and can simplify testing. Once a function is tested, you call it many times in your program without having to paste or type it into multiple locations. For readability, in the main program below, the only reference to rolling dice is in the function call to "RollDice." If you are testing and debugging the robot, you don't need to touch the dice rolling function.
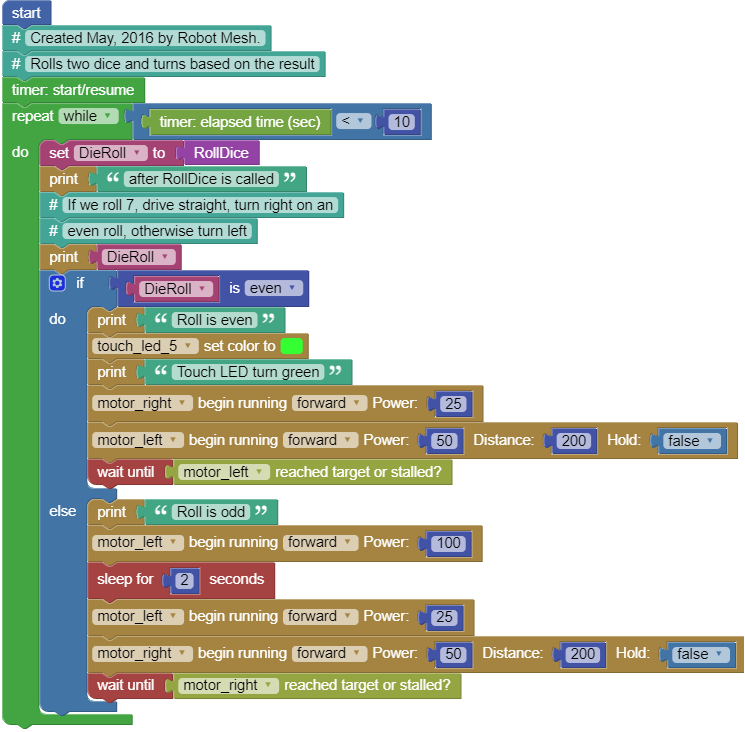
This is the function called from the code above. You will note that the output of this function is a variable called "DieRoll" which is set at the end of the function as the "return."
¶ Timer
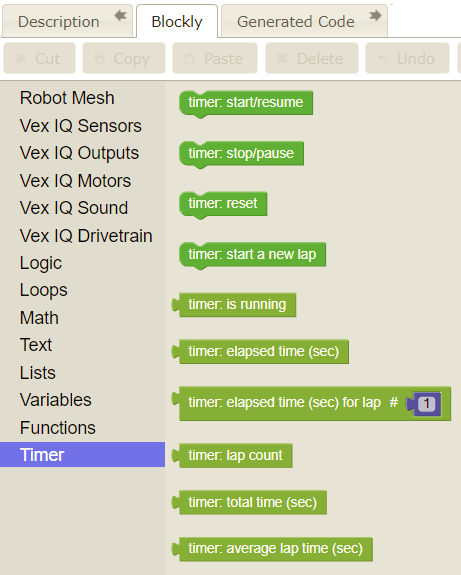
Blockly has a built-in timer which you can use for controlling your robot. These can come in especially handy for programming autonomous routines.
Timer: Start/Resume turns the timer on.
Timer: Stop/Pause stops the timer.
Timer: Reset resets the timer to 0 seconds.
Timer: Start a New Lap starts a new lap, if you are using the timer for lap timing.
Timer: Is Running checks to see if the timer is running and returns True for yes, and False for no.
Timer: Elapsed Time (sec) will, if you have started a new lap, show the time in seconds for the lap.
Timer: Elapsed Time (sec) for Lap returns the time for the specified lap number.
Timer: Lap Count returns how many laps are complete.
Timer: Total Time (sec) returns the total number of seconds that have elapsed since the timer has started.
Timer: Average Lap Time (sec) returns the mean of all lap times (the average lap time).